 13°C
13°C
Scorecard
To Download the Manor golf club scorecard click on the link Below
| Hole | Name | Par | White Yds | SI | Yellow Yds | Red Yds | SI | |
|---|---|---|---|---|---|---|---|---|
| 1 | Set | 4 | 342 | 9 | 333 | 328 | 12 | View Hole |
| 2 | Pit | 3 | 173 | 11 | 150 | 132 | 16 | View Hole |
| 3 | Summit | 5 | 605 | 1 | 556 | 453 | 2 | View Hole |
| 4 | Ivor's Island | 4 | 382 | 3 | 359 | 249 | 6 | View Hole |
| 5 | Ox-bow | 3 | 183 | 17 | 148 | 143 | 18 | View Hole |
| 6 | Laurel | 4 | 318 | 15 | 309 | 299 | 14 | View Hole |
| 7 | Gorse | 4 | 393 | 5 | 401 | 413 | 8 | View Hole |
| 8 | Oak | 4 | 324 | 13 | 312 | 276 | 10 | View Hole |
| 9 | Railway | 4 | 387 | 7 | 370 | 370 | 4 | View Hole |
| Out | 35 | 3107 | 2938 | 2663 | ||||
| 10 | Devil's | 4 | 367 | 6 | 337 | 310 | 11 | View Hole |
| 11 | Bank | 5 | 477 | 16 | 472 | 467 | 3 | View Hole |
| 12 | Blythe | 4 | 333 | 8 | 323 | 292 | 9 | View Hole |
| 13 | Short'un | 3 | 121 | 18 | 111 | 101 | 15 | View Hole |
| 14 | Ruby’s Retreat | 4 | 281 | 14 | 277 | 270 | 5 | View Hole |
| 15 | Saddle | 4 | 383 | 2 | 360 | 332 | 1 | View Hole |
| 16 | Ash Bowl | 3 | 172 | 12 | 154 | 106 | 17 | View Hole |
| 17 | Long'un | 5 | 581 | 4 | 574 | 464 | 7 | View Hole |
| 18 | Leese Hill | 4 | 270 | 10 | 262 | 231 | 13 | View Hole |
| In | 36 | 2985 | 2870 | 2573 | ||||
| Out | 35 | 3107 | 2938 | 2663 | ||||
| Total | 71 | 6092 | 5808 | 5236 |
Keep in touch
Sign up to receive the latest news and updates
We had my daughters christening party here in the new function room & it was wonderful. The staff went above & beyond to make her day as special as we wanted it to be. The catering was gorgeous & everyone thoroughly enjoyed themselves. The whole room & tables were decorated absolutely beautifully. Thank you to all at The Manor Golf Club. I would highly recommend holding any kind of event here 😊
Hole 1: Set
Stoke Index: 9

Hole 2: Pit
Stoke Index: 11
Carry The pit! Aim left of pin. Green slopes back to front but also left to right.
A tricky Par 3!

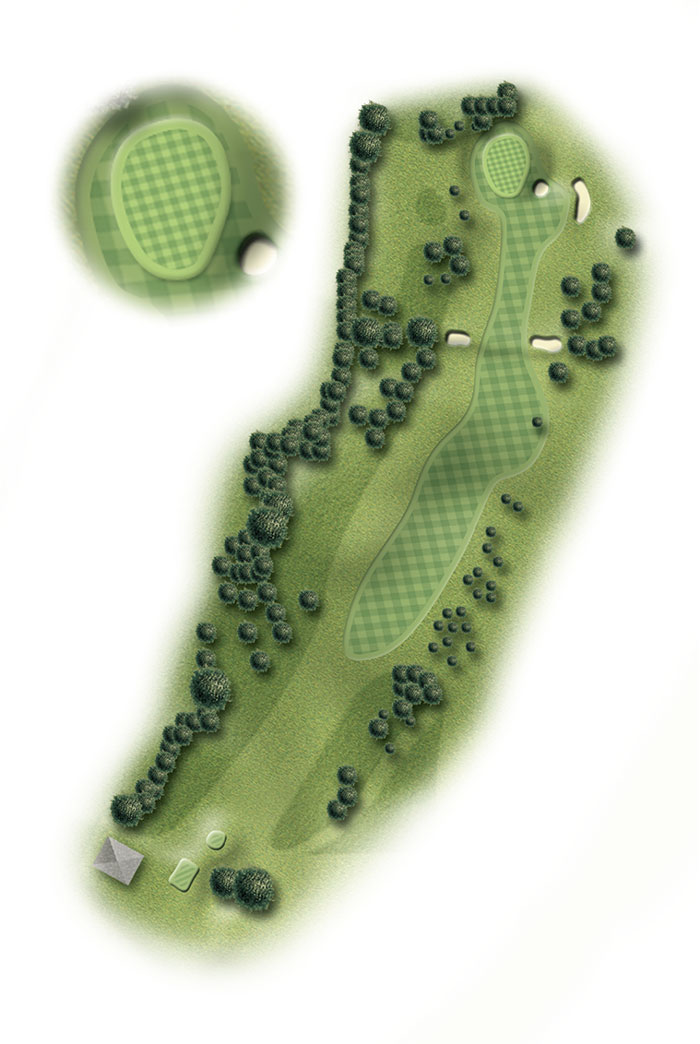
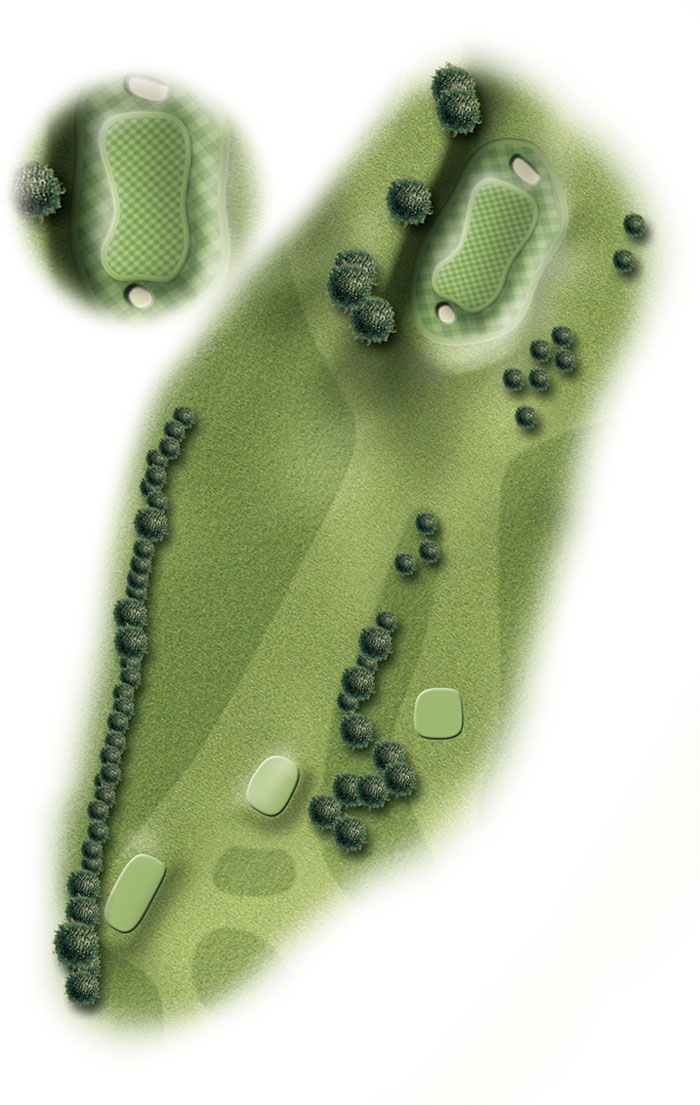
Hole 3: Summit
Stoke Index: 1
Tee shot – ideally played with fade to hold the fairway centre. A good tee shot will be rewarded however, there are numerous hazards, if in doubt, play safe – short of the yellow stakes will leave around 150 yds in. Tricky green – make sure your not big if the pin is on the front level.
This hole is sponsored by JACK FROST CHILLER & FREEZER HIRE
www.jackfrosthire.co.uk 07970 292024 sales@jackfrosthire.co.uk
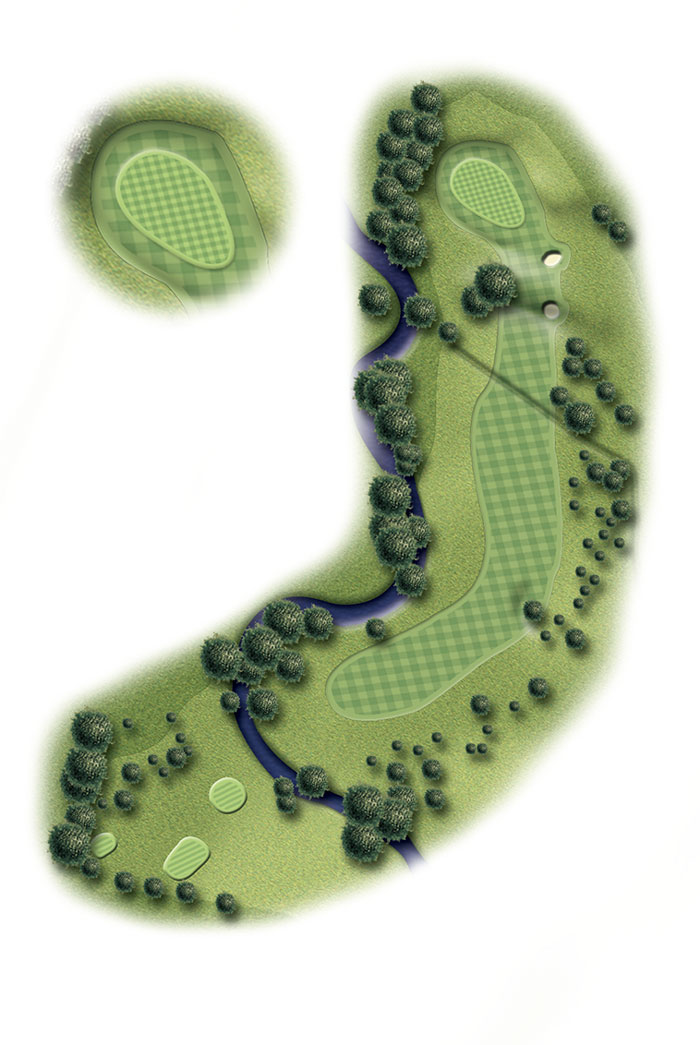
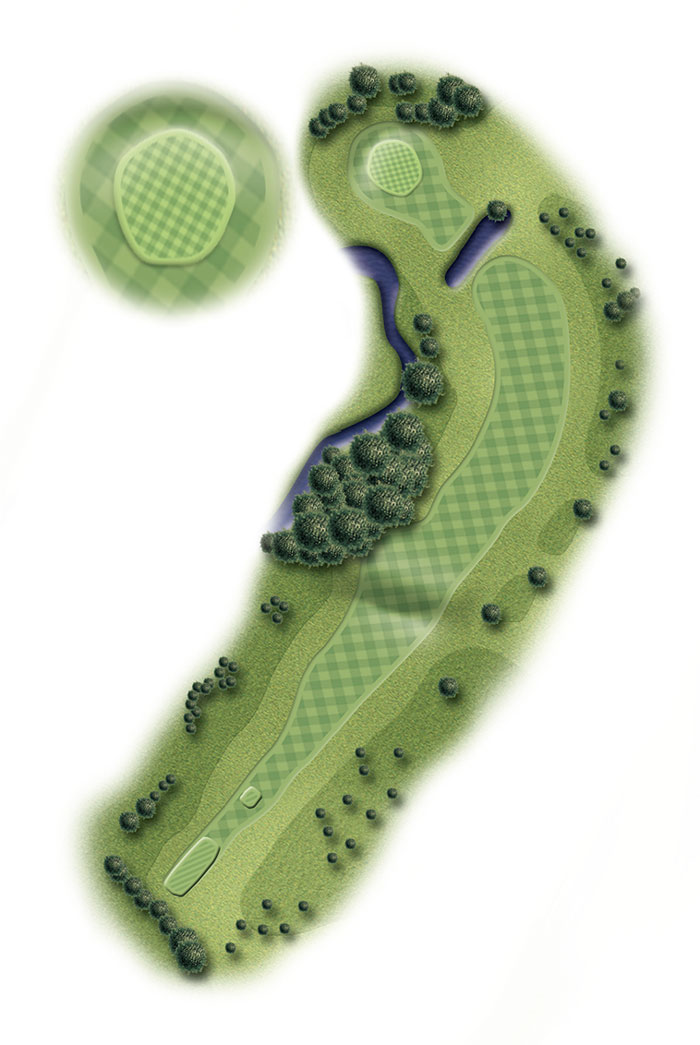
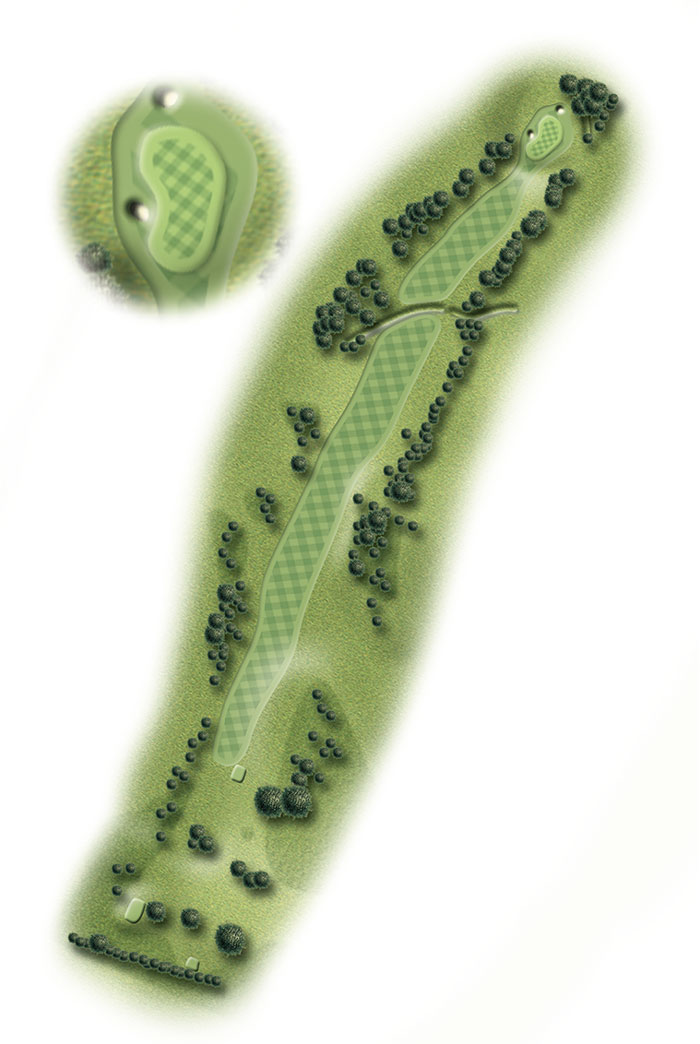
Hole 4: Ivor's Island
Stoke Index: 3
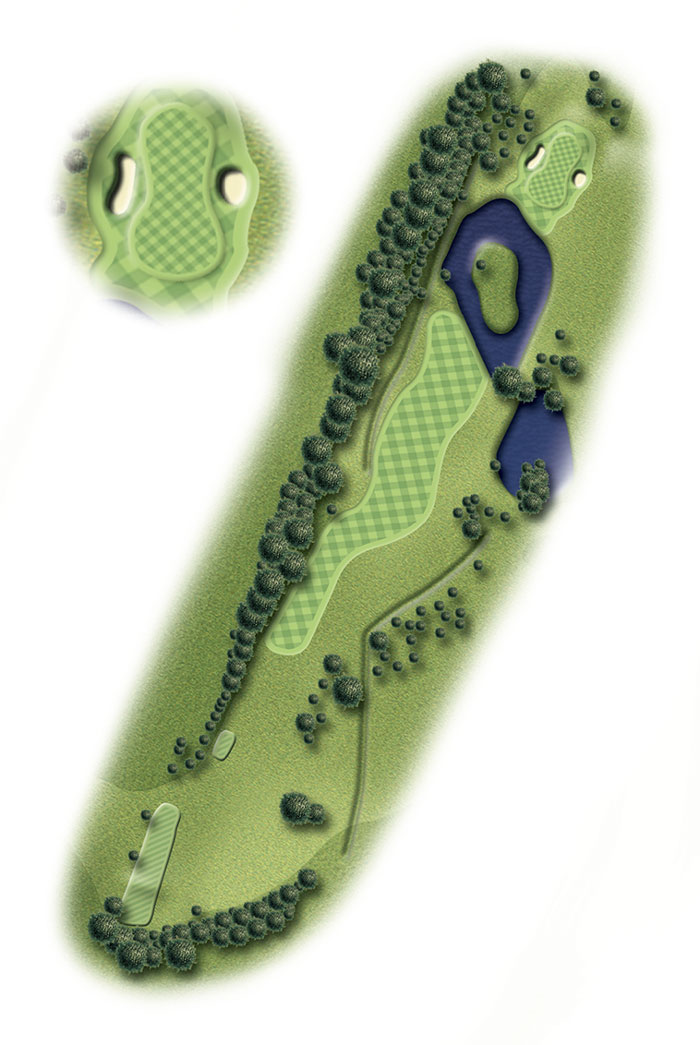
Our Signature hole! Tee shot – from the tee the fairway looks narrower than it really is, big hitters be careful of running out of fairway. Second shot over the pond – long narrow green, trust the yardage.

This hole is free for sponsorship
call 01889 563234 for more details
Hole 5: Ox-bow
Stoke Index: 17
Beware left hand bunker. Centre of the green is always a good target here, no matter where the pin is.

Hole 6: Laurel
Stoke Index: 15
Tee shot – easy hole if played sensibly. Leave the driver in the bag, a long iron is enough for position – as far left as you dare with going into the bunkers. Second shot – beware hidden bunker on left of green. Also, the hump on the front right.
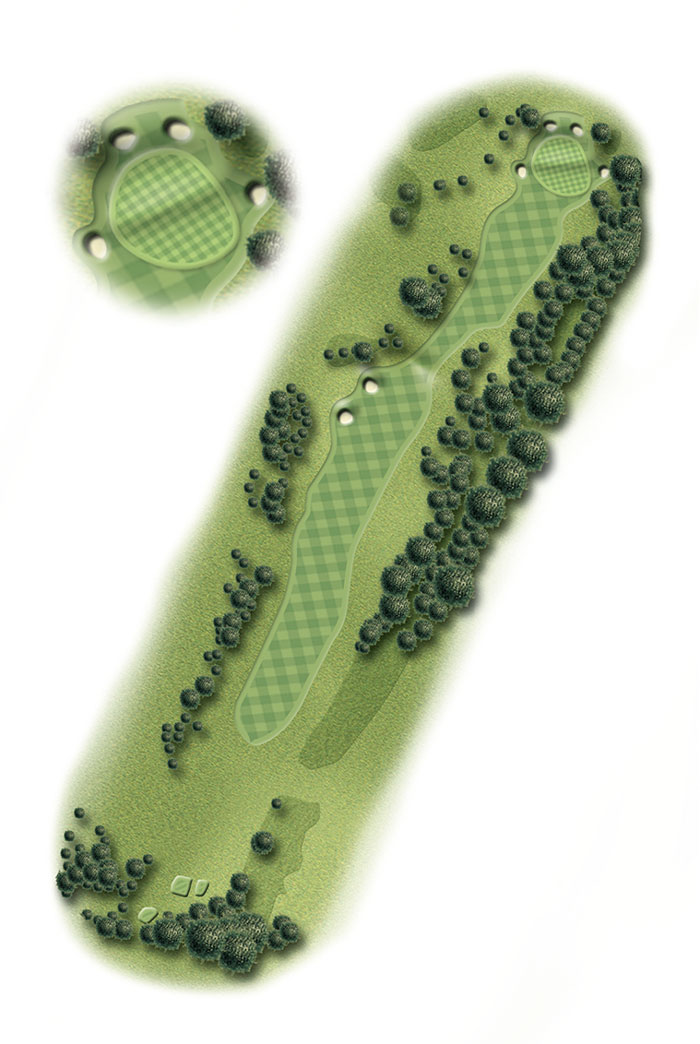
Hole 7: Gorse
Stoke Index: 5
Tee shot – usually with the prevailing wind so doesn’t play it’s yardage. A great design – the longer you hit your tee shot, the more trouble you can get into – the longer the tee shot, the easier the second – a good test. Second shot – just avoid the two front bunkers.

This hole is available for sponsorship
call 01889 563234 for more details
Hole 8: Oak
Stoke Index: 13
As the 6th, put away the woods and play for position. Take a short cut over the left hand conifer, 200yds will leave a flick into a nice receptive green – a good birdie chance.

This hole is sponsored by Pappa Leeks https://www.facebook.com/p/Papa-Leeks-Pizza-100076399110266/
find on facebook or instagram
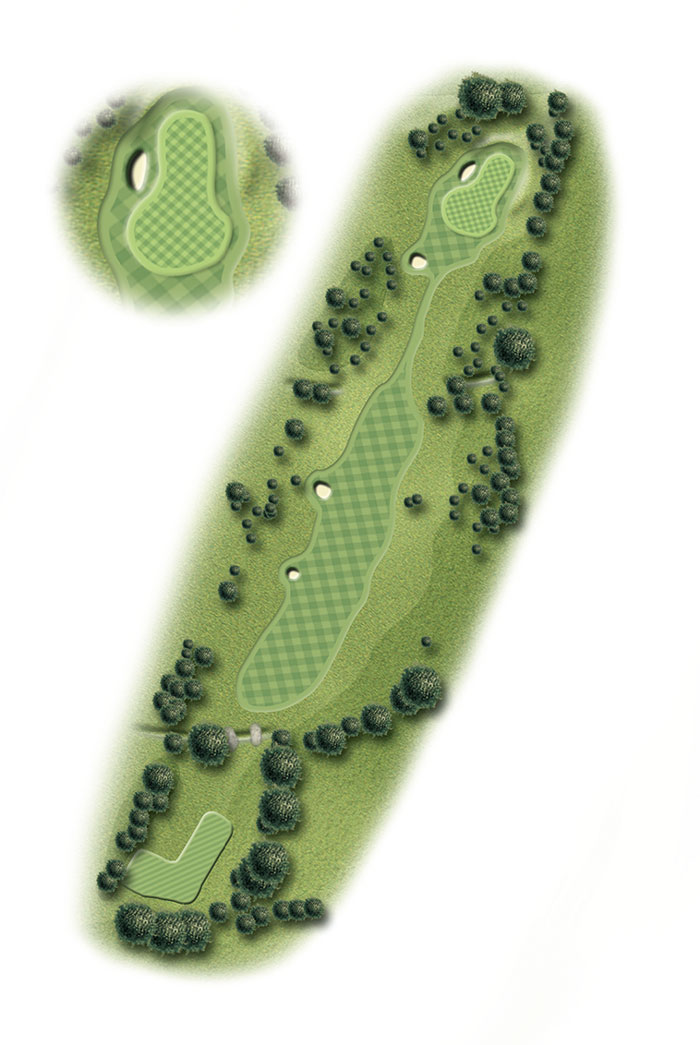
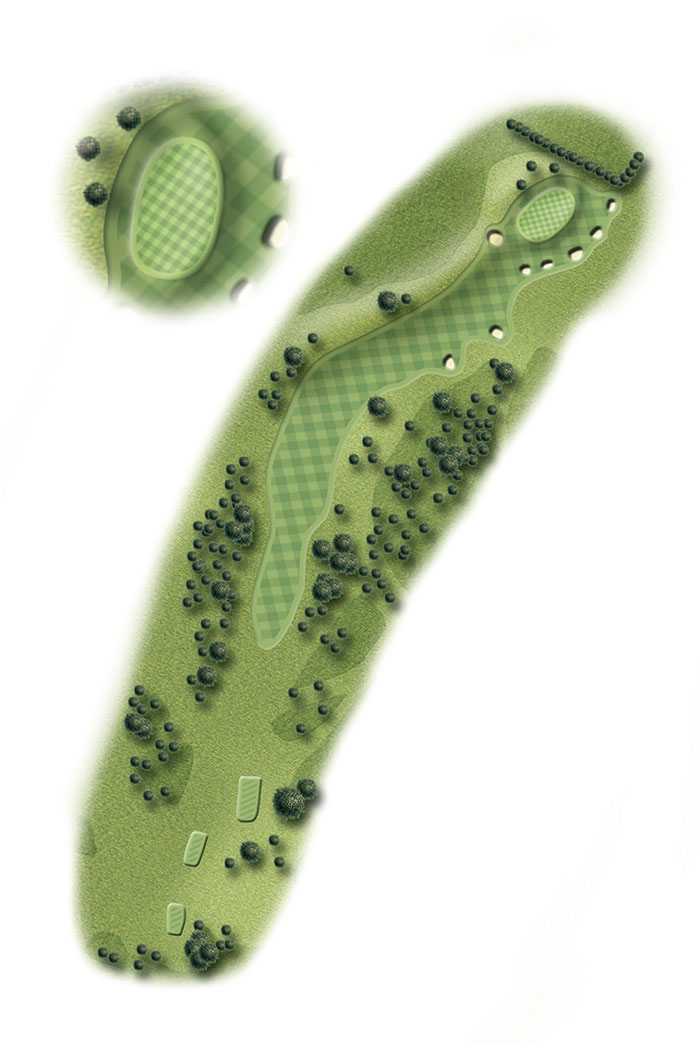
Hole 9: Railway
Stoke Index: 7
Plays longer than yardage due to wind – it’s usually against. Just avoid the 2 bunkers on left hand side at 250-280yds. Second shot – it’s a huge green but still, DON’T GO LONG!

This hole is ready for sponsorship
call 01889 563234
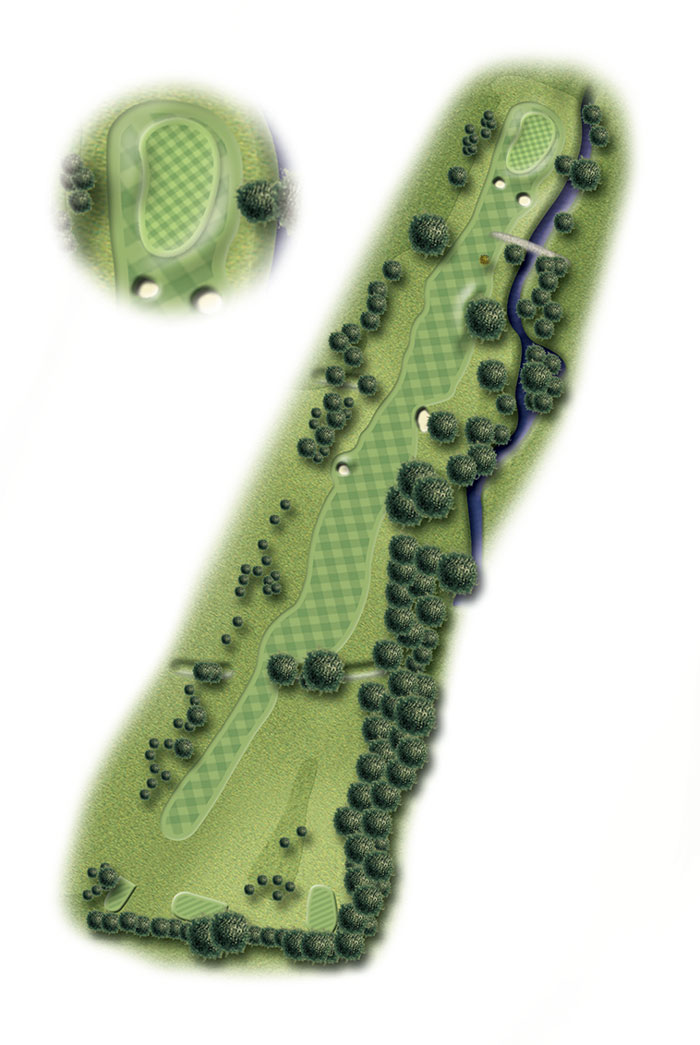
Hole 10: Devil's
Stoke Index: 6
A tight tee shot, try and land the ball in the left hand side of the fairway, otherwise the hawthorn tree comes into play at 280 yds. Second shot – nice friendly bank on the left, just avoid the hidden bunker. Miss the green right and you’re in trouble.

Hole 11: Bank
Stoke Index: 16
Tee shot – aim down the centre with draw, the fairway is firm and if you hit the short cut, the ball will run. Second shot – it’s a blind shot but the green is the same as the 10th but without a left bunker so aim left of the pin and the ball will run down. Once again, trust the yardage.

This hole is open for sponsorship
call 01889 563234
Hole 12: Blythe
Stoke Index: 8
Tee shot – as for the other short par 4’s, play for position – 200yds and straight will leave a short iron to a small green – another birdie chance.

This hole is sponsored by https://cotoninteriors.co.uk/
Hole 13: Short'un
Stoke Index: 18
Trust the yardage – the front bunker brings the green closer to the naked eye, but there is room between the bunker and front of the green.

This hole is sponsored by MEACHEN & BEVAN
https://www.meachenandbevan.co.uk/
Electrical engineers & contractors
01889 507293 www.meachenandbevan.co.uk
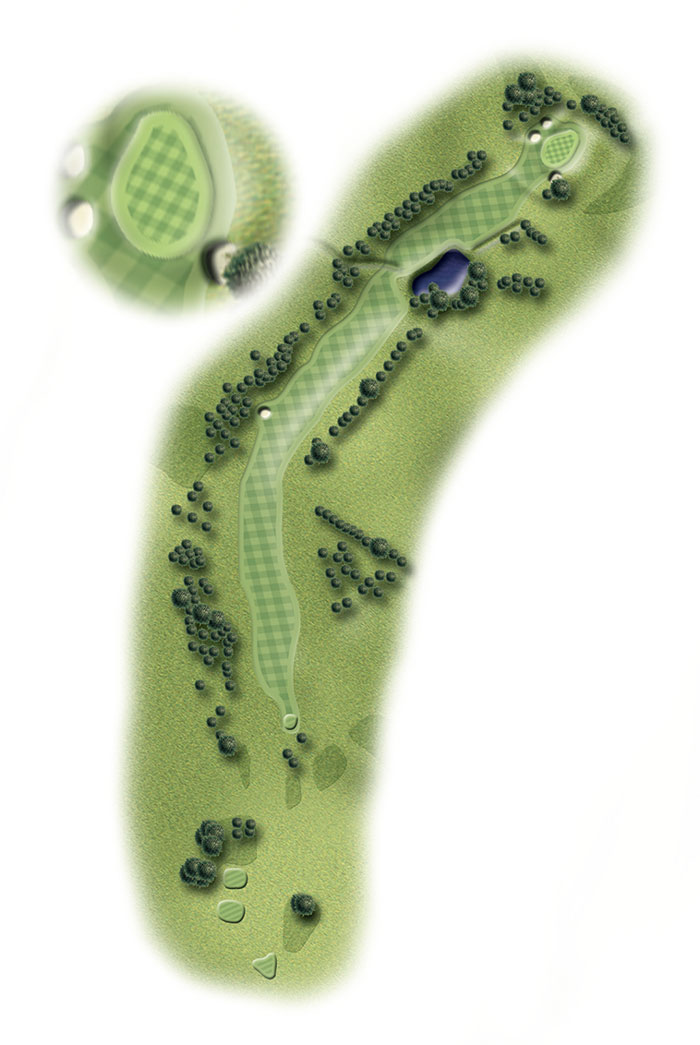
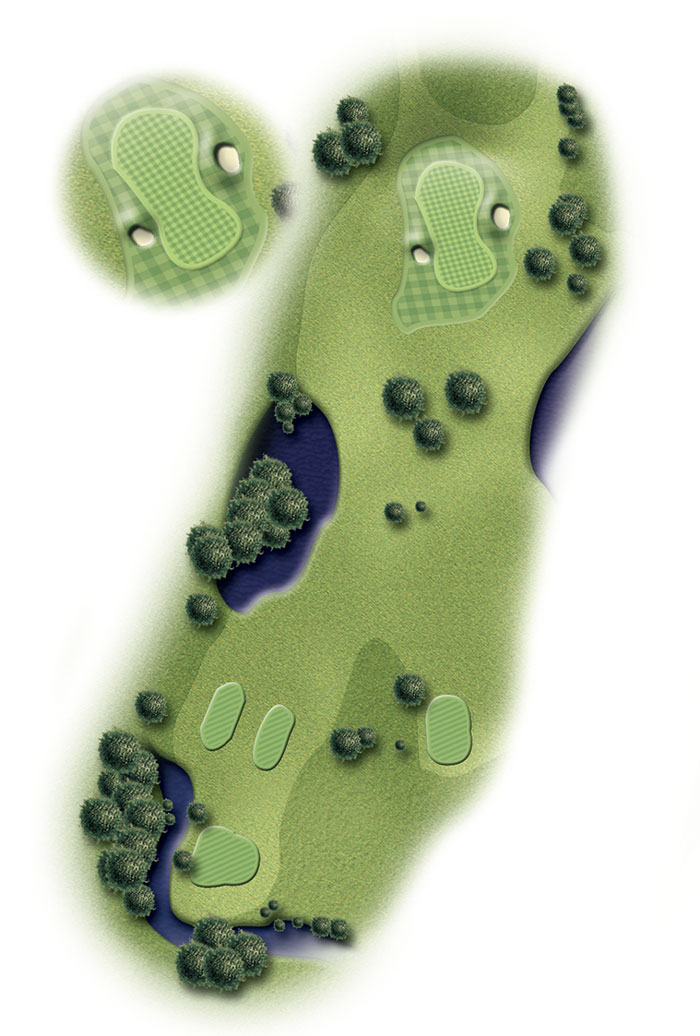
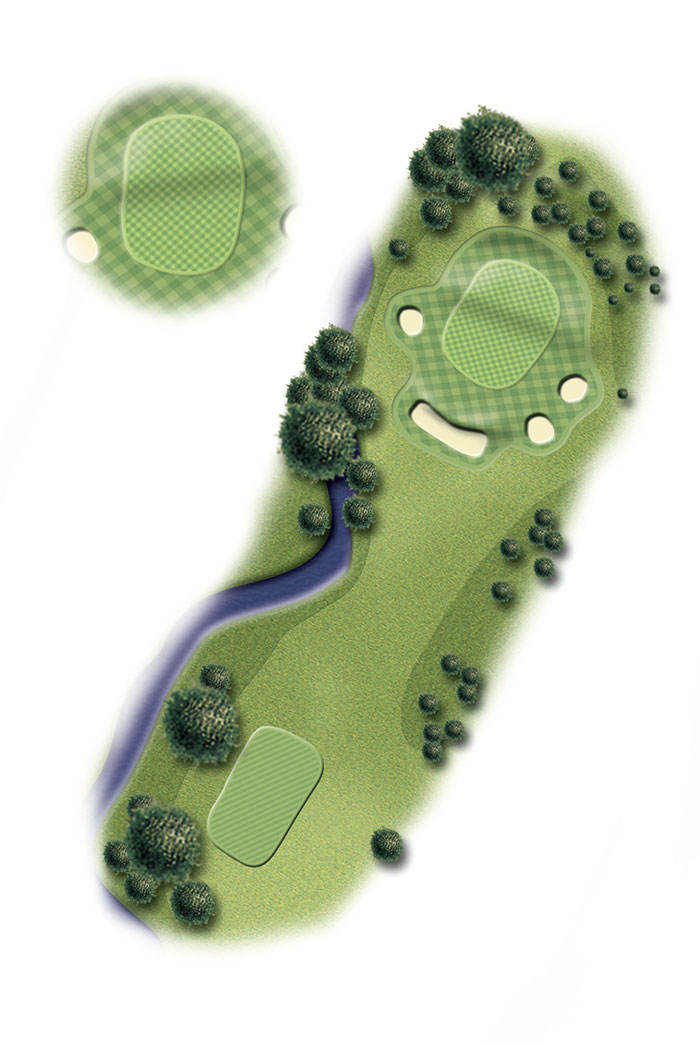
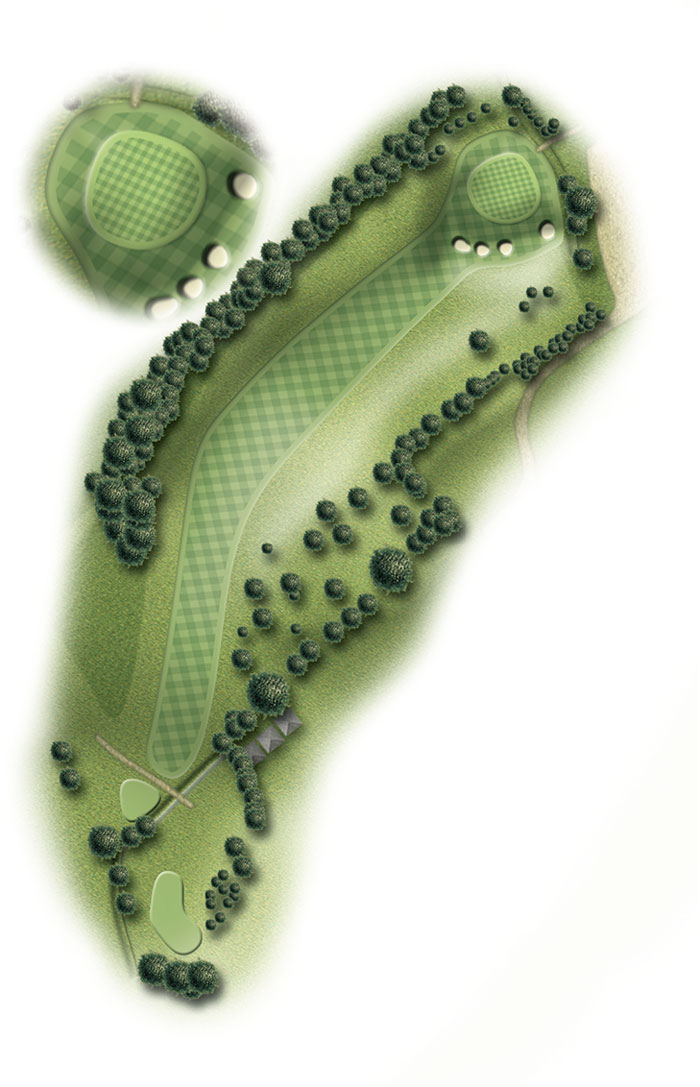
Hole 14: Ruby’s Retreat
Stoke Index: 14
Another signature hole Tee shot – a classic ‘risk and reward hole’– a good tee shot will leave you close or even on the green. Just avoid the river.

This hole is sponsored by https://www.cg-midlands.co.uk/
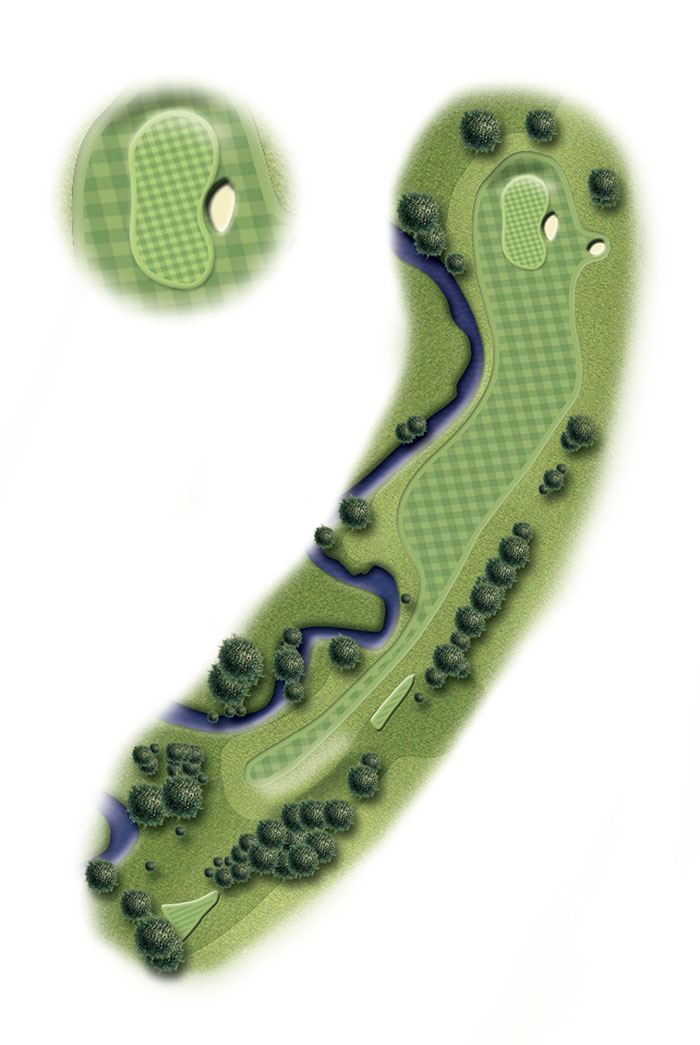
Hole 15: Saddle
Stoke Index: 2
Tee shot - hitting fairway is vital here, only the biggest of hitters will get far enough up the hill and still be able to reach from the semi. Second shot – club selection is vital here more than anywhere else on the course. Tiny green with a bank at the back. If you’re long, your dead.

this hole is ready to sponsor
call 01889 563234
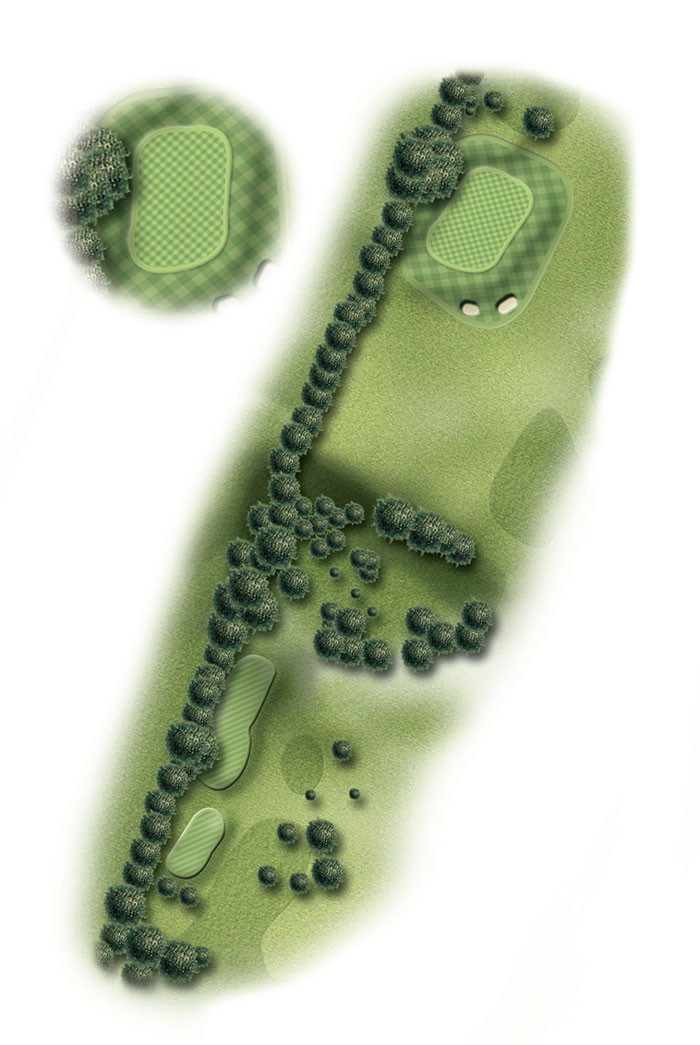
Hole 16: Ash Bowl
Stoke Index: 12
Wind always plays a big part here, it’s the highest point of the course. You can hit wedge or you can hit driver depending on direction and speed. Avoid front bunker.

This hole is sponsored by https://www.macgroundworks.co.uk
Specialist surfacing engineers
www.macgroundworks.co.uk
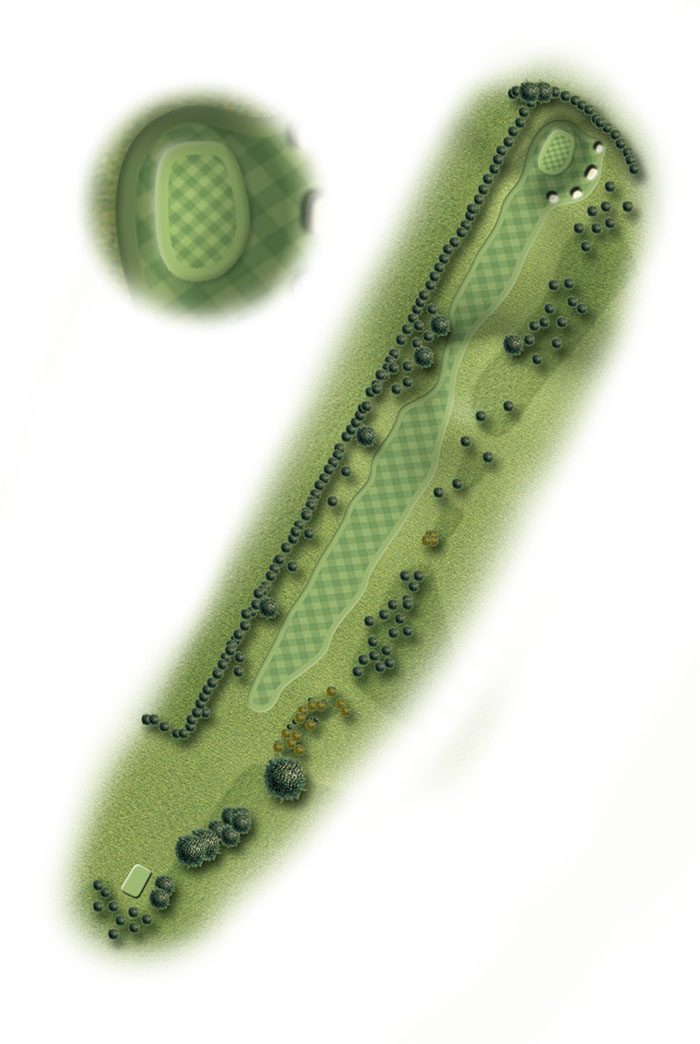
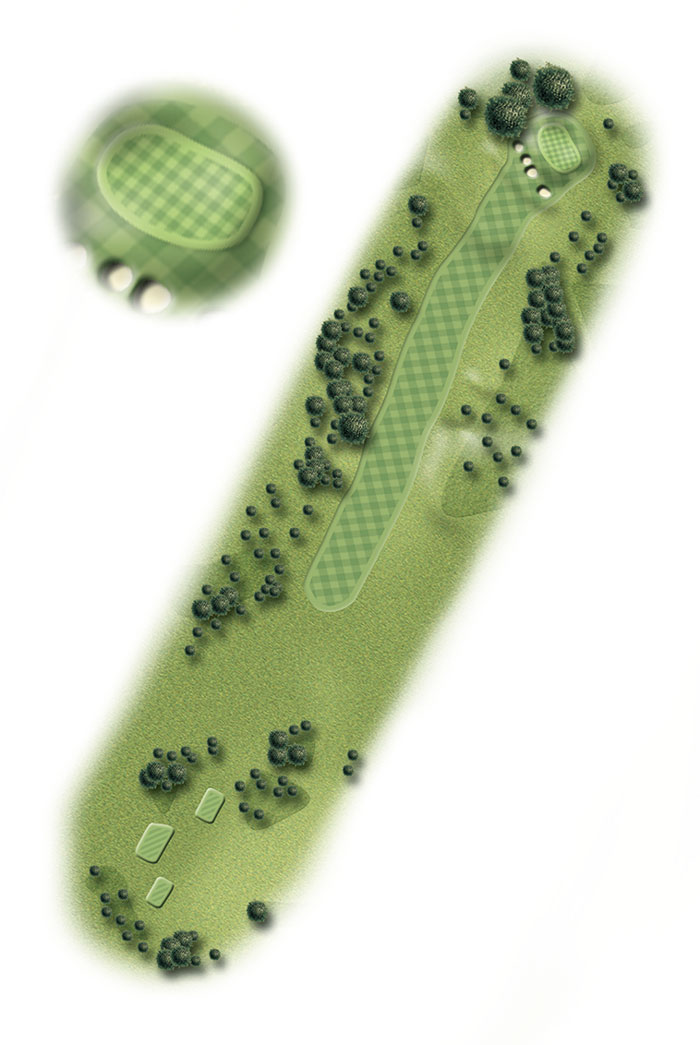
Hole 17: Long'un
Stoke Index: 4
Take in the views! Tee shot. Let loose the driver and watch it sail. Tricky small green, beware when pin is on the front.

This hole is sponsored by
Class AA PGA Tuitionhttps://www.philcarygolf.co.uk/
Customised lesson packages available
01889 563234 p.cary@sky.com
Hole 18: Leese Hill
Stoke Index: 10
Tee shot – played best with a fade. The green is best approach with a full shot in, so try and leave yourself around 100 yds. just remember the uphill second shot will take a lot off your yardage, the green-side bunkers are lethal.
